Friday, July 9, 2010

I need some Ideas!!

I need your help

Tomorrow is the husband and my anniversary and I still haven't bought/made him anything. I'm pretty sure I'm getting him tickets for a ball game but I'd like to make something too.

This is where you come in. I need some ideas of funny/cute things a man would like. I pretty much suck at thinking of guy things.

If you have a great idea leave me a comment with a link to the post if there is one, if not just the idea would be great!

Thanks.

I've linked up to a bunch of Follow me Fridays. If you follow me I will follow back. Here are the links. :) Hope everyone has a great weekend.


New Friend Fridays
My Wee View
friday-follow

Wednesday, July 7, 2010

Knock It Off

Here is my newest knock off. I love to look around for cute clothes from big name companies and try to make my own. I saw this dress at Old Navy and loved it but wanted it in a different print. This is what I came out with.

Adorable right? Yeah she has her eyes closed in both pics but I loved them anyway so here they are. Want to know how to make your own? This is a really easy dress to make.

Here is what you need...tank top, fabric, thread and elastic thread.

I used half a yard of fabric but ended up cutting a bit off for the shirt version, for the dress I used the whole half a yard.

I got my tank tops at Old Navy when they were 5 for $10. This would be great also if you have tank tops with stains on them.

First I serged the top of the whole width of the fabric. Selvage to selvage. If you don't have a serger you can press down 1/4 in. and then another 1/4 in. to hem it.

Now it is time to shirr it. Don't know how? I found a great tutorial here.

I sewed my first line right below my serged edge.

Then I used the edge of my presser foot lined up with the row before it for even lines.

I sewed 5 rows.

Here it is before pressing it to gather it even more.

Pressing it. Don't go back and forth on the stitches. Just press and lift and repeat. (please ignore my dirty iron)

Here it is all shirred!
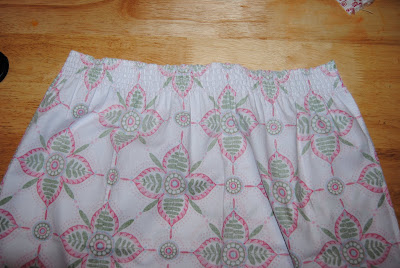
Fold your fabric right sides together so the selvages are both on one side and sew that side seam.

Put your tank top in between the layers where you want the shirred part to start. I measured down 2 in. from the arm holes. I marked my fabric with a pin so I would know where to sew the side seam. Take the tank out and sew your seam. I sewed a slight A-line here.

Now you will have a tube for the skirt of the dress.

Slip the tank back into the skirt part and pin in place.

Now to sew the skirt of the dress to the tank top.

With a regular straight stitch sew all around the dress 1/4 in. from the top. Again I used my presser foot as my guide.

Almost done! Flip your dress inside out and trim your fabric to the length you want.
For this one I made a shirt so I went a little below the bottom of the tank and hemmed it up.

For the dress do all the steps above just leave it longer. You can cut your tank top bottom off if you want but I just left mine. Less work!


So there it is....My newest knock off. For those of you still waiting for the J. Crew knock off tutorial it is coming. I got frustrated and had to walk away from it for a while then kinda forgot about it. Sorry.

Now I want to see your knock offs! I will be hosting a link party each week where you can link up your knock offs. It can be clothing, decor, a favorite restaurant meal. Anything that you see somewhere else and recreate.

Please in your post give credit where credit is due. I want to see your inspiration!

My plan is to eventually have a giveaway every time I have a link party but that will have to start in a couple weeks. If you are able to donate something for a giveaway email me and we can start that sooner! I will also be giving away some of my own things too.


Rules:

Grab a button from my sidebar and either put it in your Knock It Off post or on your blog somewhere.

Link directly to the post not to your homepage.

This isn't a rule but everyone loves comments! Go comment on as many links as you like.

I'm adding a link to my J. Crew Knock Off to get it started!


Button, Makeover and a Surprise...Oh My

I've been working all day on my makeover. It really was time.

I think it will stay this way for a while. I change my mind constantly so who knows.

Besides the knew background I have finally made a button.

MainBlogButton


<center><a href="http://beckywaldrop.blogspot.com"><img src="http://i888.photobucket.com/albums/ac88/beckywaldrop/blogbutton3.jpg" border="0" alt="MainBlogButton" /></a></center>

I hope you stick one on your blog. Please let me know if you do so I can get yours and put it on mine.

Tomorrow I will have a tutorial and something new. Here is a hint.


So check back tomorrow to see what's going on.


Tuesday, July 6, 2010

Wednesday, June 30, 2010

The Cousin Flag

My entry for this weeks Red, White and Blue challenge at The CSI Project is...a flag dress. Or I guess flag dresses? I made my daughter and 2 of her cousins a dress each and had a mini photo shoot tonight. I love how they turned out.

I used this pattern from LilBlueBoo. It's the best!

The girls loved their dresses. Together they are awesome, separate I'm thinking the second two will look more like Waldo than a flag. haha.

I had to stop the car on the drive home to get a picture of this sunset! Beautiful!


Visit thecsiproject.com


make it wear it

Thursday, June 24, 2010

Heather Ross Wall Decor


Renting=Plain White Walls

I found this wall hanging at a store a few weeks ago and it's just been sitting around since waiting for me to figure out what I want to do with it. It's ok as is but not my style.


I got it for 50% off because one of the 'frames' was broken off. I fixed that with my trusty tie dye duck tape. Duck tape can fix ANYTHING.

I started by painting over all the wine decals in white.

While that was drying I cut out some of my favorite Heather Ross fabric from a template I made from one of the frames.

I attached the fabric with my trusty mod podge and then put some more Heather Ross fabric in some embroidery hoops.


I pretty much love it.


I think when I get tired of this I will put pictures of the family in there. How cute would that be?!


Visit thecsiproject.com


Surfer room Dot Art


We rent. So that means plain white walls. We have been here nearly a year and well lets just say my decorating bug just isn't there. I've been trying to think of a way to decorate my daughters room and I found a small wooden sign at the dollar store that says 'Surfer Girl'. So that's what we are going with. I just started so it's not nearly done but here is what I started with.

I got some vinyl that is for the Silhouette but since I don't have one of those yet, I just used my circle punch from EK Success. I think I may be a bit crazy with this one. That was a ton of circles to cut and stick!

My kids knew what the things were as I was putting it up so I hope you all do too. It is not the best and definitely not perfect but it's something different and my kids think it's cool so that's all that matters right?

Eventually I would like to fill the whole wall with dots and get some more definition on there but this is for now. Looking at these pictures now it doesn't look like that many circles. Who wants to count them for me? haha.
Visit thecsiproject.com

LinkWithin

Related Posts with Thumbnails